前言
最近一直在折腾关于 Clash 相关的内容,一直没仔细了解具体的功能
正好有点时间上网冲浪🏄(不是摸鱼)
也因为 mac 使用 doh 用 cloudflared 一直不稳定,无法正常解析导致有点烦躁
一不做二不休尝试一下 CFW 的 TUN 模式
操作
Fndroid/clash_for_windows_pkg (github.com)
CFW 版本 v0.20.19
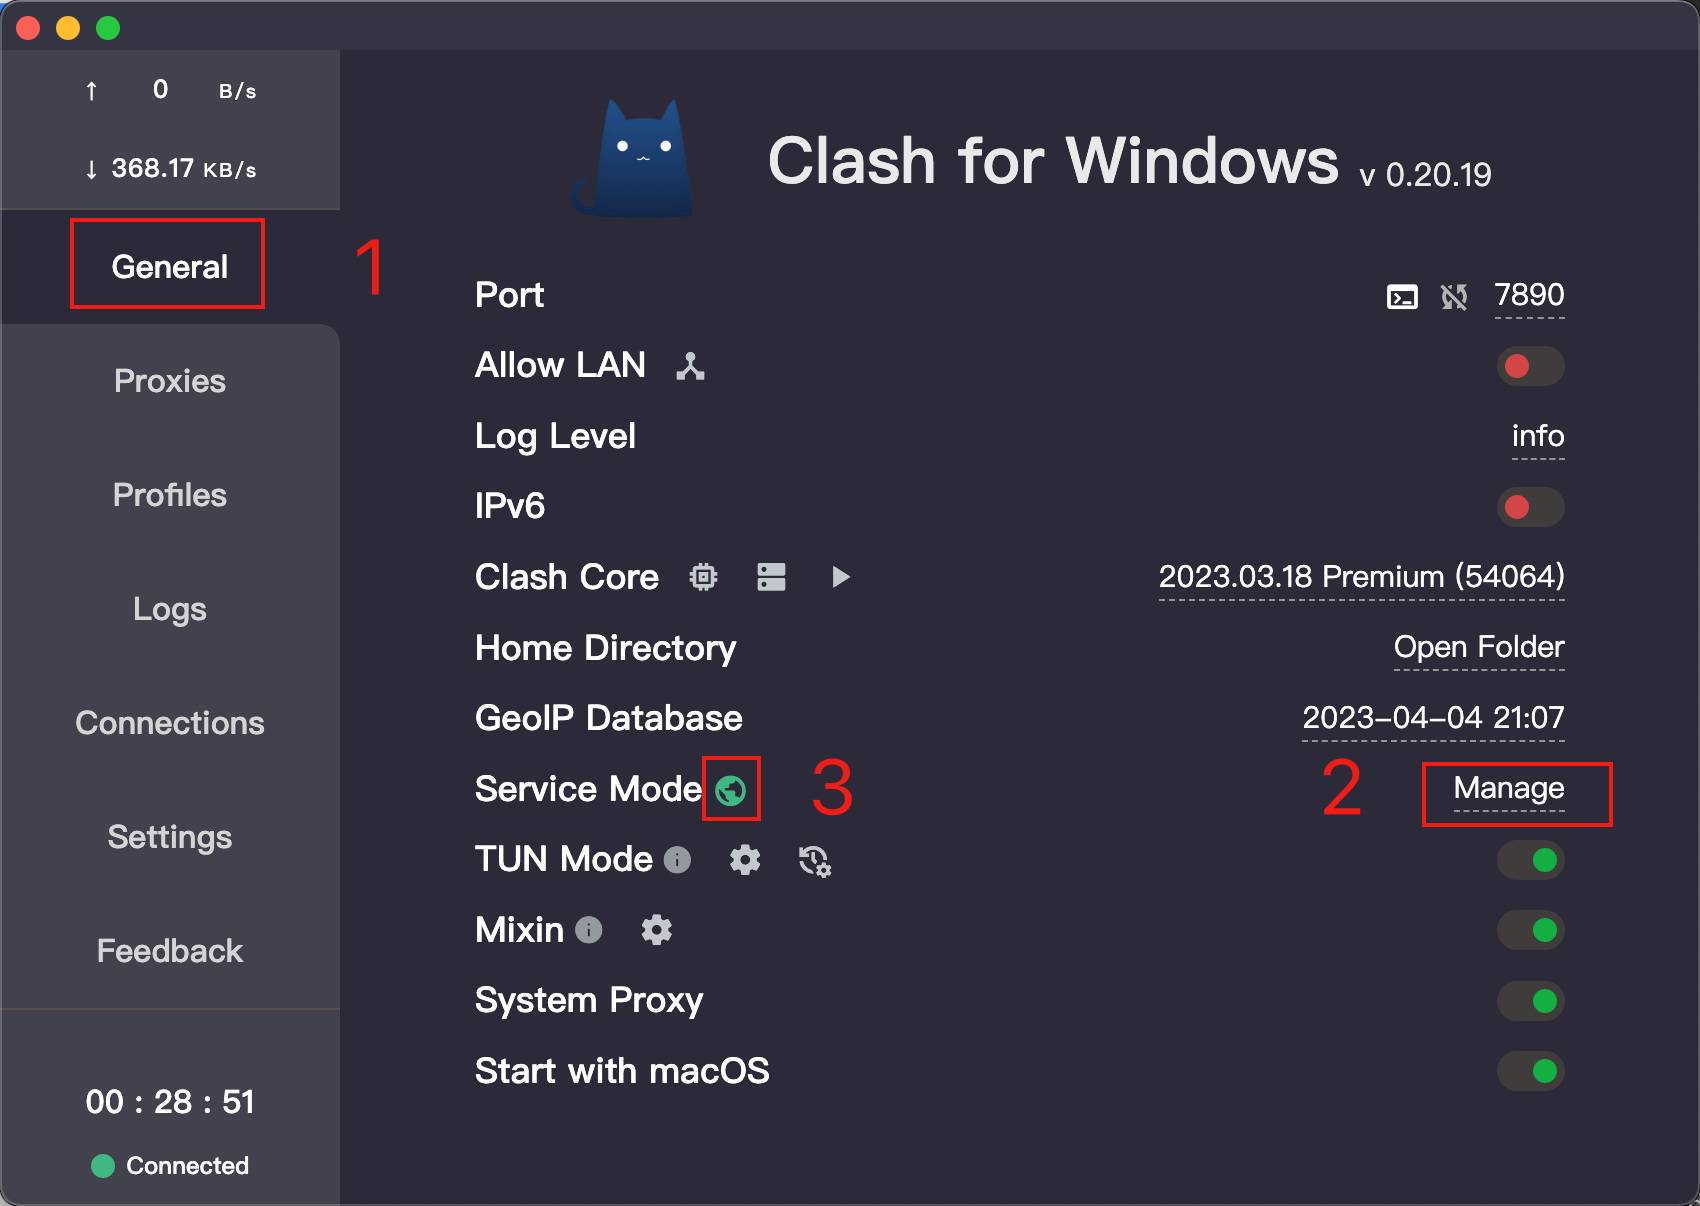
1、安装 Service
也就是左边菜单上的 General -> Service Model,点击右侧的 Manage 再点击 install 即可,如之前已经安装过可点击 update
此时 Service Mode 右侧的小地球变绿了,就代表你绿安装成功了
2、Mixin 配置
下面给出我自己常用的 Mixin 配置
点击 Mixin 右侧的小齿轮 ⚙️,在弹出的编辑器里将下列内容直接全部粘贴复制
注意配置生效需要开关一次 Mixin 模式,也可点击 Clash Core 右侧的芯片按钮(可能)可以查看当前生效的配置
  1
  2
  3
  4
  5
  6
  7
  8
  9
 10
 11
 12
 13
 14
 15
 16
 17
 18
 19
 20
 21
 22
 23
 24
 25
 26
 27
 28
 29
 30
 31
 32
 33
 34
 35
 36
 37
 38
 39
 40
 41
 42
 43
 44
 45
 46
 47
 48
 49
 50
 51
 52
 53
 54
 55
 56
 57
 58
 59
 60
 61
 62
 63
 64
 65
 66
 67
 68
 69
 70
 71
 72
 73
 74
 75
 76
 77
 78
 79
 80
 81
 82
 83
 84
 85
 86
 87
 88
 89
 90
 91
 92
 93
 94
 95
 96
 97
 98
 99
100
101
102
|
mixin: # Mixin 配置文件
  # DNS服务器
  dns:
    # 开启Clash内置DNS服务器
    # 默认为false
    enable: true

    # 使用 ipv6 解析
    # 默认为 false
    ipv6: false

    # DNS 监听端口
    listen: 0.0.0.0:53

    # 解析nameserver和fallback的DNS服务器
    # 填入纯IP的DNS服务器
    default-nameserver:
      - 114.114.114.114
      - 119.29.29.29
      - 223.5.5.5
      - 223.6.6.6
      - 8.8.8.8
      - 8.8.4.4
      - 4.2.2.1
      - 4.2.2.2
      - 1.1.1.1

    # 模式fake-ip  or  redir-host
    enhanced-mode: fake-ip

    # 使用本地 hosts 文件
    use-hosts: true

    nameserver:
      # 腾讯DoH DNS Server地址
      - https://doh.pub/dns-query
      - https://sm2.doh.pub/dns-query

      # 腾讯DoT DNS Server地址
      - tls://dot.pub

      # 阿里DoH DNS Server地址
      - https://dns.alidns.com/dns-query
      # 阿里DoT DNS Server地址
      - tls://dns.alidns.com

      # 360 DoH DNS Server地址
      - https://doh.360.cn
      # 360 DoT DNS Server地址
      - tls://dot.360.cn

    fallback:
      # cloudflare DoH DNS 地址
      - https://1.0.0.1/dns-query
      # Google DoH DNS Server地址
      - https://dns.google/dns-query
      # Google DoT DNS Server地址
      - tls://dns.google

    # fake-ip仅有
    fake-ip-filter:
      - "*.lan"
      - "*.local"
      - "*.localhost"
      - "*.msftconnecttest.com"
      - "*.msftncsi.com"
      - msftconnecttest.com
      - msftncsi.com

    # fake-ip仅有
    fallback-filter:
      geoip: true
      geoip-code: CN
      ipcidr:
        - 0.0.0.0/8
        - 10.0.0.0/8
        - 100.64.0.0/10
        - 127.0.0.0/8
        - 169.254.0.0/16
        - 172.16.0.0/12
        - 192.0.0.0/24
        - 192.0.2.0/24
        - 192.168.0.0/16
        - 192.88.99.0/24
        - 198.18.0.0/15
        - 198.51.100.0/24
        - 203.0.113.0/24
        - 224.0.0.0/4
        - 240.0.0.0/4
        - 255.255.255.255/32
      domain:
        - "+.facebook.com"
        - "+.google.com"
        - "+.youtube.com"

  tun: # Tun 配置
    enable: true # 启用 Tun 模式
    stack: system # gvisor/system 使用 system stack 请按照本文后面防火墙放行程序
    dns-hijack:
      - 198.18.0.2:53 # 本地劫持 DNS 地址,无需修改
    auto-route: true
    auto-detect-interface: true # 自动检测出口网卡
|
3、使用
在控制台中 ping google.com
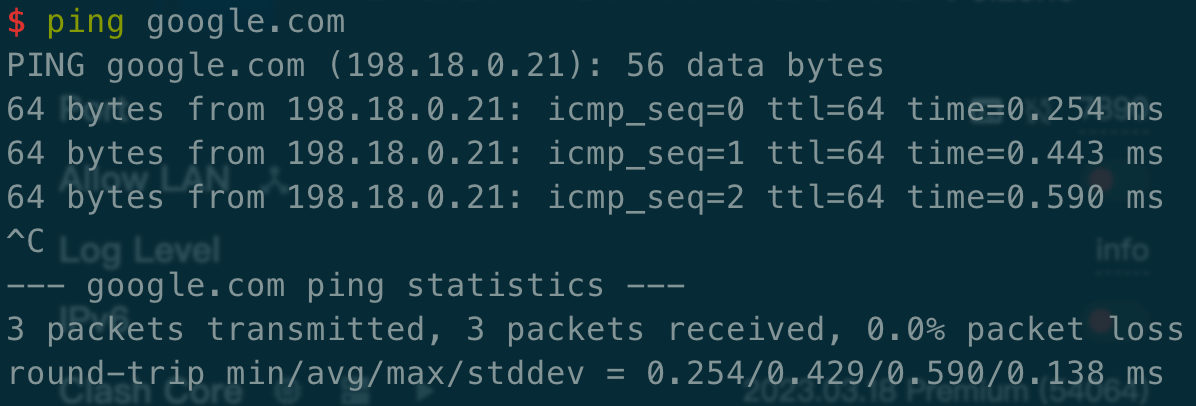
可以看到已经被代理到 fake-ip ,再执行 curl google -v
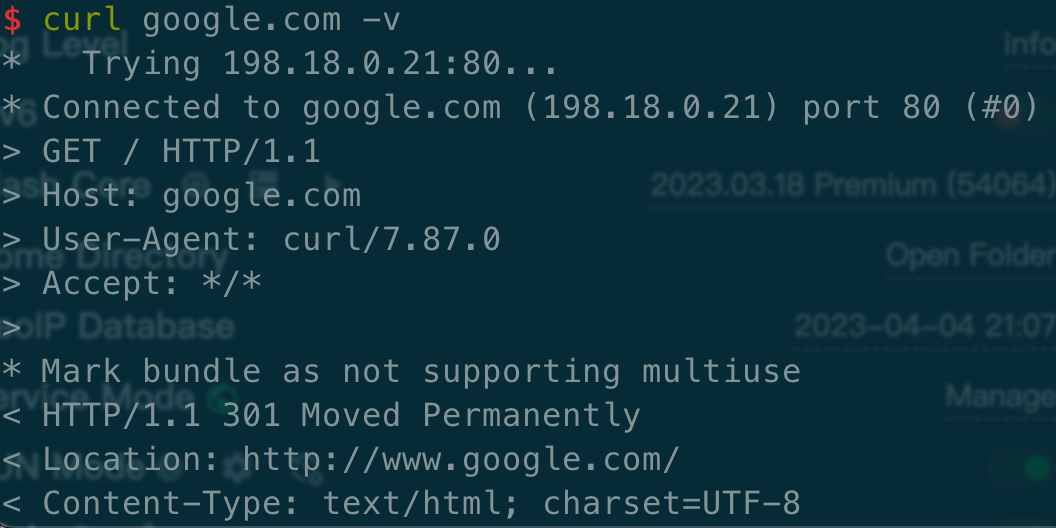
恭喜你已经成功了~
 RoninZc 收录于 杂记